Showing posts with label how to. Show all posts

Friday, August 5, 2011

Liquid Sidewalk Chalk


Its my new favorite thing to do. I found a tutorial here

Takes literally 2 minutes to make, and kept the kidlets busy for an hour and a half (and likely would have been longer if we hadn't spilled 2 of the four jars).

Here's what you will need:

1 cup water

1 cup cornstarch


food coloring


It doesnt get much easier.

You just mix up the water and the cornstarch.

Separate it into containers (like perhaps the zillions of baby food jars that you've kept cause they'll be good for something...or is that just me?), and then add the coloring as you wish.
ok, seriously, how cute are they?
And voila! You have fun in a jar.


When it first goes on, its more like water paint, but as it dries it becomes more vibrant. And once they got tired of painting the sidewalk, we created an entire garden of painted rocks. Fun!

and BEST of all. It washes off everything. Sidewalk, clothes, kidlets.

Wednesday, August 3, 2011

Ocean in a Jar

Trying to get L back into a sleep routine, which means K and C have been pretty tied down during the mornings and they get all wrangley. Solution? Crafts, crafts, crafts.


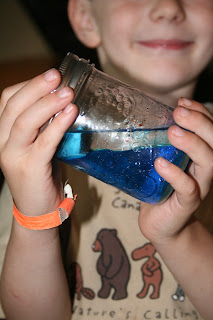
Today we did a science experiment and they each made an 'Ocean in a Jar'. Super cute and super easy.

What you will need:
  • baby oil
  • water
  • mason jar
  • food coloring
  • glitter
  • small floaty toy
  • some uber excited scientists
**Cautionary note** Do NOT leave 3 year old unattended with glitter as you search house for baby oil as this will occur:
incase picture doesn't do it justice, that would be an entire vile of glitter on C and the chair and the floor...
Ok, so once you've cleaned up the glitter and regrouped, here's what you do.

Step 1: Fill the mason jar with water, about 1/2 full

Step 2: Add a few drops of food coloring. Ask intelligent questions like, "What do you think will happen when we add the color? Do you think it will mix with the water?"

Step 3: Add the baby oil, maybe 1/8 to 1/4 of the jar's worth. You judge. Smell it...just cause it smells so nice. Ask more smart questions like, "What do you think will happen when we add the oil? Will it mix, what did you notice?"

Step 4: Add some glitter, where does it float?

Step 5: Add the toy. Again, talk about where it floats. 


Step 6: Put on the lid and let them (gently) rock the jar. See how the contents move, but don't mix? They thought that was really neat. 
or shake it like a crazy person...that works as well

Of course K & C wanted a train in there, which did float, but not right side up like it should. Would probably work better with a little bath toy or something, but what the heck, they were happy.


And in the interest of shameless self promotion, this post is participating in the Summertime and the Living is Thrifty's link party (via the ON{the laundry}LINE blog). Check it out for some other quick and easy summer crafts and while you're there, send a vote my way :) 


Thursday, June 23, 2011

Best Playdough Recipe

Want to be the coolest mommy ever? Then do I have the stuff for you...homemade play-dough. Who knew?
Since we have entered monsoon season, its been a battle to think of new things to keep the boys entertained. I cancelled the cable a few weeks ago so we could 'spend more time outside and enjoy the summer'. (Guess how well that plan worked out?! Lol, its basically been raining ever since.) So, I decided to try my hand at some play-dough. We have the store bought stuff, but there's nothing quite like homemade. I found a fabulous recipe, and I thought I'd share. It was so much easier than I originally thought, and it only took about 5 minutes per batch. So far we've been using it for almost two weeks and its exactly as it was the day I made it...aside from the fact that C's ration went from 3 bright colors, to 1 muddy blob. Either way, it keeps them entertained for HOURS, which is great :)
Enjoy
You will need:
1 cup white flour
1/4 cup salt
2 Tbsp Cream of Tartar
1 Tbsp Oil
1 cup water


Method
Mix together all the ingredients and heat over medium low heat stirring constantly. After about 3-5 minutes the dough will come together to form a ball that looks something like this:
Mmmmm, looks yummy, no?

At this point, remove from the heat and knead the dough for another 3-5 minues. I've also seen versions thatsay to add the food coloring at the kneading stage, which I suppose would work well if you wanted a few different colors from the same batch.

And TAH DAH! You are officially cool. How cool you ask? So cool that, as K put it, "Other kids might say their Mom is the best, but no, YOU are the BESTEST MOM in the WHOLE WORLD."

Store it in an air tight container (I keep it in the fridge) and you are good to go!


Monday, February 22, 2010

Fancy on a Budget

Once again we have our house on the market. I think we are insane. This is the second attempt at moving out of the city and after only a week we're almost ready to throw in the towel. Two preschoolers, two yappy dogs, a home based business...its practically impossible to keep the house in "showing" condition. I'm exhausted. Add to that a failed offer on a spec home ( I hate builders!!) and 25+ showings in the last week, did we really need to stress?

For a really long time James and I have been wanting a shift in lifestyle, to move somewhere with some real land and privacy and slower pace of life. Because James works out of the house, we spend a tonne of time here and although we love Tuscany, we also feel like we live in a fishbowl, everyone can see our yard, and we can see into a lot of windows (not that we try to, that sounds a bit more "peeping Tom-ish" than was intended. So, after flip-flopping for months on whether to make a go at it, we decided to take the plunge. Anyone want to make my life easier and buy my house? Check me out on mls.

A big part of this move plan was to try a reduce our mortgage. But, as we tend to lose focus, we're actually now starting to look at bigger homes on bigger lots, and hence, bigger budgets. So, since that is obviously not reaching our goals, we've really cracked down and created a budget. One that I think we can stick to, and I will blog about so that I'm held accountable.

The biggest cut to my spending is in the grocery budget. Is it just me or is it near-impossible to keep a shopping trip under $150? I really paid attention this week and managed to keep it to $125, but that meant cutting a lot of "fancy" treats and opting to make it myself. One of my favorite treats is cream cheese spreads. I LOVE the veggie cream cheese from the Great Canadian Bagel, but its oober expensive. So yesterday I made it myself. Who knew it was so easy and yummy! Here's what I did. I took about 125ml of light cream cheese, mixed in about 2T of cream of leek dry soup mix (Knorr), and added some shredded carrot, celery, and spinach. Its awesome. I think next I'll try a fruit one.

Fancy even on a budget.

Thursday, December 24, 2009

Christmas Treats: Vinaterta

I had great ambition this year. I thought I was going to somehow find the time to create beautiful baked treats for family and friend, and help  my mom with her Christmas dinner, preparing homemade perogies and other special sides. So far, not much luck. What I have managed to bake, my family has managed to eat, so very little in the way of "giftgiving" was actually acheived. And with the sad realization the perogies would not be handmade this year I thought, Ok, can't do perogies, maybe I'll make my Dad the chocolate chiffon cake he's been (not-so-subtley) hinting for. As we speak a deflated Chocolate Chiffon Cake is mocking me in my oven. Another "Charlie Brown" cake is about to make its way to the Hemminger household.

The one treat I did manage to make that reminds me of Christmas' at my Grandma and Grandpa's house is Vinaterta. My grandmother started making this Icelantic treat for my Uncle many years ago. It is a layered cake, the cake is almost like a shortbread, with a sweet prune filling (I can see that face your making. "Prunes? Yuck" But seriously, this is probably my favorite thing in the entire world, and if I didn't tell you it was prunes, you wouldn't know).

So, here is a very coveted family recipe. Mine isnt nearly as pretty as my grandmother's perfectly layered cake, but it all tastes the same.

Guess I'll see how many of my relatives are actually reading this now :)

Vinaterta

Cake:
1 cup butter
2 eggs
4 cups flour
1-1/2 cups icing sugar
2 Tbsp sweet cream
1 Tbsp baking powder
1 tsp vanilla
1 tsp cardamon seed

Directions: Cream butter and sugar. Beat in eggs, cream and vanilla. In a separate bowl, sift flour, baking powder and cardamon. Add to wet mixture.

Divide dough into 6 equal parts. Press each into a 9" cake tin (greased and floured) and bake at 375F for 12-15 minutes. Remove from tin when warm and let cool on wire rack. (they will harden)

Filling:
1 lbs prunes
2 cups sugar
1 tsp cinnamon
1 tsp vanilla

Directions: Boil the prunes until softened. Drain and reserve 1/2 cup "prune water". Blend the prunes, water, sugar, vanilla and cinnamon until smooth.


To Assemble:  Once both the cakes and the filling have cooled, assemble the vinaterta by layering cake then filling. My mom always has said Grandma used to let her cake sit a few days to "cure". To serve, it is best to cut the cake when it is frozen/cool as the layers hold better and the slices come out cleaner.

SO YUMMY! Hope you enjoy!

Sunday, December 20, 2009

Christmas Treats: Nalysnyky [Crepes]

Tis the week before Christmas, and all through my house, Mommy is frantically baking!!! Cookies and cakes, and other traditional treats all need to be finished...well yesterday. So I thought that this week I would multi-task and share some recipes on my blog while I bake them.

For the last few years we've been trying to establish a breakfast tradition. I've been making a "Puff Pancake" that I really enjoy...but James, not so much. So this year we are going to substitute a recipe I've been making for a few years. Its a Ukrainian pancake, Nalysnykys. Traditionally you would cook up the crepes and fill them with a savory dry cottage cream mixture. You roll them up and then warm them through in the oven. Yum! But the actual mixture is fantastic for crepes. Here's what you do:


Nalysnyky
  • 2 eggs
  • 1 1/2 cups milk
  • 1/4 t salt
  • 1 T sugar
  • 1 cup  flour
  • 1 T melted butter
Beat the eggs, add sugar, salt, butter, milk and dry ingredients. Mix like pancakes (the batter should be VERY thin). Heat a non stick pan to med-med/hi.


Pour about 1/3 cup of batter onto the pan
and then quickly spread the batter ( i just use a spatula) using a circular motion until you have covered the pan with one thin crepe. Let cook until top side is nearly cooked through (45-60 seconds), and then flip.


 Let cook 20-30 seconds until back side is finished (it will not brown).
It takes a few tries to get a feel for the timing, but once you do these could not be easier to make.


Fill them with fruit (i love a nice apple sauce) or just eat the with syrup. ENJOY!!!
*note* Please forgive the plate :) Its one of the "extras", I think it was my Grandma Rose's circa 1991